So, the new year is finally here and while it is the typical time to make new resolutions for the year, I generally abstain from this cliche because usually, these newfound resolutions {although they are created with good intentions} are forgotten by the time Valentines Day hits. However, this year is a big year for me. After six and a half years of exams, classes, and clinical rotations {or as I would like to call it "free labor from PA students"}, I am finally making my transition into the professional world {and the world of pay checks! :) }. This year will be an opportunity for change and new beginnings. With that in mind, there are a few things that I would like to work on. These aren't new years resolutions per se, because I intend these to be more of a lifestyle facelift that will last well beyond 2013. Here goes...
1. Become a "Betty"
Yes, I am admitting it, I am an impossible cook. I once attempted to make Kylar and I some eggs, bacon and pancakes while Raynor was at work and it was a BIG MISTAKE! I nearly started a grease fire with the BLACK bacon, meanwhile the pancakes were stuck to the pan and refused to flip over properly and Kylar was crying on the floor because she dumped all of her Cheerios onto the ground {which I was stepping on, creating a crumbly mess!}. When Raynor came home I believe his words to describe it all were a "war zone" and he said "why don't you just leave the cooking to me?!". And then we decided that he would do the cooking and cleaning and I would make all the money. The end! :) Yeah right.. Like he would let me off cleaning duty that easy! So, for the last six and a half years I have had my nose in a book for my goal/dream of becoming a physician assistant. now that I have conquered that goal, it is time to focus on a goal in a different arena: the kitchen!
2. Be more organized about life.
I add the "about life" part because the "norm" for me and my family is chaos and spur of the moment change of plans. I have spent the past 6 years following my husband around the country watching him play ball. Therefore, baseball dictated our schedule. And as a perfectionist/planner I was always emotionally scarred when my perfectly thought out plan did not come to pass! {just kidding.. But seriously though!} So, now that Raynor is back at home and I am finished with PA school, I am hoping life will be a little more "normal". But then again, who am I kidding?! I sometimes enjoy the thrill and unpredictability of chaos and working in the neurosurgery field will be a far from normal pace of life! However, my attempts at a more organized lifestyle start with the basics: go to bed early {which I hate} and wake up early {which I REALLY hate}. No matter how much I loathe the wee hours of the morning, I think it is vital that I get into a routine of spending time with the Lord, renewing my mind before the day begins. {now, let's just hope that these early morning convos with God don't also include some Zzzz's!} And besides, when you have to be at the hospital at 6am for surgeries, whats a few more hours of lost sleep.. Right?!
3. Serve hard, serve abundantly.
Last but not least, this is my favorite one. There have been countless people in my life that have blessed me in some way or another and they may not even know it. I only hope that I have been or will be a blessing to others. Oftentimes, life gets so hectic and there are so many distractions that it is hard to remember to serve others or simply pray for others that have wronged you in some way or who are just simply annoying! {sorry about the last one, but let's just be real here! Everyone has someone in their life who knows how to push their buttons and these people are the hardest to pray for!} It is so easy to get bogged down in all the drama and get distracted with the "he said, she saids" that it is hard to focus on the real picture. Most likely, the stem from ALL drama is jealousy which is a result of personal insecurities {whether it's yours or the other persons}. So, I would like to challenge you and myself to pray for the person who is the cause of your frustration because they are probably battling bigger demons than what is apparent. Matthew 7:12 says "So then, whatever you desire that others would do to and for you, even so do also to and for them, for this is the Law and the Prophets." It is my goal, not only for the new year, but for a lifetime to serve others whether it is through medicine, monetary support, a helping hand or just encouragement. I believe this is what makes life enjoyable and filled with purpose.
Happy New Year!
Blessings,
Sarah

Wednesday, January 2, 2013

Tuesday, December 18, 2012
Furniture Find! Repainting an old entryway piece!
I love finding a bargain! Whenever there are estate sales in the area, I love looking for old furniture to spruce up. I found this entryway piece at a local estate sale for $90. It was an ugly hunter green color and was in desperate need of some TLC. So, to Home Depot I went in search of some heavy duty paint+primer to cover this piece. I used valspar paint+primer in a satin finish and it covered the old glossy paint perfectly!
BEFORE:


BEFORE:

AFTER:


 |
| My little helper! :) |
How To: Handprint pillow ornament!

The other day, my friend and I had a playdate with our little ones and we attempted to make salt dough handprint ornaments and it didnt turn out so well..

Mine ended up as an ornament poof! Which, in a way, inspired my next idea for a handprint ornament! I have found that paint handprints last so much longer and is a little bit easier (if you can prevent your child from getting paint everywhere! I highly recommend a helper!). Here is what you will need:
1/4 yards of sturdy fabric (I used some canvas that I had in my craft closet)
Ribbon or jute rope
Pillow stuffing - I didn't have any pillow stuffing so I just used cotton balls :)
Needle & thread (you can either hand sew the pillow or use a sewing machine)
Paint

 |
| My curious little one :) |
 |
| NOTE: this is where the helper comes in handy! I did this project by myself and we ended up with red paint on the table, chairs and on our clothes! Luckily, it wiped off easy :) |
 |
| After your handprints dry (I gave mine at least 12 hours), take your measuring tape and give about 1 cm border on the widest part of the handprint. Mine ended up being about a 12 cm x 12 cm square but this will vary depending on how big your child's handprint is. |
 |
| Cut out the handprint and another square of fabric for the back side of the pillow. |
 |
| Place the handprint fabric on top of the blank fabric and sew up three sides leaving one side open for you to put in the pillow stuffing (or in my case, cotton balls!) |
 |
 |
| Tie your ribbon or jute rope and cut each end. |
 |
| Stuff the ornament with pillow stuffing or cotton balls. I used about 12 cotton balls per pillow but you can use more or less depending on how "fluffy" you want your pillow! |
 |
| Place the ribbon or jute rope inside the pillow and sew the remaining side of the pillow together. NOTE: after I did this pillow, I realized how difficult it was to sew the jute rope while the stuffing was in there. So, I sewed the top side of the pillow with the jute rope first, before the other sides and it was much easier :) |

Viola! Finished product! These make great presents for family members and are very simple and easy to make!
Sunday, September 23, 2012
Kylar's Pink Lemonade Themed First Birthday Party!
Kylar had such a wonderful first birthday party and we are so thankful for all of our friends and family who came to celebrate it with us! She had so much fun playing with her friends, opening her presents and eating her birthday cake! I still can't believe my sweet baby girl is one but I am loving watching her learn and grow. She never ceases to amaze me with all of the new things she learns! After much planning and preparation, here are some of the highlights of her birthday party!


 |
For this sign, I hot glued the letters onto paper doilies and fed yellow yarn through the holes of the doilies.                
Check out Printable Candee Designs here on Etsy for the Pink Lemonade Party Pack that includes all of the designs I used for her decorations! It was so easy! She designed all of the water bottle labels, cupcake tags, food labels and more for only $30! Definitely worth it!
|
Sunday, August 19, 2012
Letters to our sweet baby girl on her first birthday
Kylar Grace,
The day I found out I was pregnant with you, I was filled with a flood of mixed emotions. I was shocked, excited, scared, nervous and thankful all at the same time. Looking back on that day, I laugh because I had no idea how much brighter my life would be with you in it. Being your mommy has been more than I could have ever imagined. Your infectous smile, sweet cuddles, mischievous grin, little laugh and big personality have changed my life forever. Over the last year, i have watched you grow from a 6 pound 7 ounce precious newborn, to a thriving sweet one year old baby girl. You never cease to amaze me in all that you learn and pick up on. You seem to learn multiple new things each day and my newfound joy is watching you display your new insights, providing entertainment for me and daddy without fail! I've been told that there is no greater love than the love you have for your child and now that I have you as my beautiful daughter, I must say that statement perfectly depicts my feelings toward you. I so thankful that I have you as my little blessing to cherish. I know that in the future, things may not always be easy but I promise to never give up on you, to always have faith in you, to teach you the ways of God's word, to instill in you morals and values, to provide for you to the best of my ability, to teach you responsibility, to always listen to you and offer you advice when times get confusing, to pray continuously over you and to love you unconditionally. Happy birthday sweet baby girl, I can't wait to see what your bright future holds.
Love,
Mommy
Dear Kylar,
I cannot tell you how proud and lucky I am to be your father. Every day when you wake up and crack your beautiful smile at me makes my day. Today is a very special day in both of our lives, it is your first birthday and although you won't remember this day, it will always be a special moment in my life. This first year of your life has been very fun for mommy and me. You have brought such joy and life into this great family. You will always be the greatest thing that has happened to me. I do not know what age you will be when you read this, but I promise to raise you with faith and love. I love you do much that words cannot describe it. Thank you for being my daughter.
Love,
Dad
P.S. A father's love will never disappear
The day I found out I was pregnant with you, I was filled with a flood of mixed emotions. I was shocked, excited, scared, nervous and thankful all at the same time. Looking back on that day, I laugh because I had no idea how much brighter my life would be with you in it. Being your mommy has been more than I could have ever imagined. Your infectous smile, sweet cuddles, mischievous grin, little laugh and big personality have changed my life forever. Over the last year, i have watched you grow from a 6 pound 7 ounce precious newborn, to a thriving sweet one year old baby girl. You never cease to amaze me in all that you learn and pick up on. You seem to learn multiple new things each day and my newfound joy is watching you display your new insights, providing entertainment for me and daddy without fail! I've been told that there is no greater love than the love you have for your child and now that I have you as my beautiful daughter, I must say that statement perfectly depicts my feelings toward you. I so thankful that I have you as my little blessing to cherish. I know that in the future, things may not always be easy but I promise to never give up on you, to always have faith in you, to teach you the ways of God's word, to instill in you morals and values, to provide for you to the best of my ability, to teach you responsibility, to always listen to you and offer you advice when times get confusing, to pray continuously over you and to love you unconditionally. Happy birthday sweet baby girl, I can't wait to see what your bright future holds.
Love,
Mommy
Dear Kylar,
I cannot tell you how proud and lucky I am to be your father. Every day when you wake up and crack your beautiful smile at me makes my day. Today is a very special day in both of our lives, it is your first birthday and although you won't remember this day, it will always be a special moment in my life. This first year of your life has been very fun for mommy and me. You have brought such joy and life into this great family. You will always be the greatest thing that has happened to me. I do not know what age you will be when you read this, but I promise to raise you with faith and love. I love you do much that words cannot describe it. Thank you for being my daughter.
Love,
Dad
P.S. A father's love will never disappear
Thursday, August 9, 2012
DIY: Vintage Paper Birthday Party Hat
For my daughter's first birthday party, I wanted to have cute little party hats for the little ones to wear. Except I was sad to find that there were no cute party hats that were similar to her party theme. So, I decided I would figure out a way to make my own! Here is what I came up with.

They really dont take long once you figure out how to make them! Here are the supplies you will need:
- cardboard party hats {I bought mine from Hobby Lobby for a few dollars}
- cute scrapbook paper
- hot glue gun & hot glue sticks {plus or minus some aloe vera for all of those burns I give myself!}
- pen
- scissors
- the decor that you use to finish the hat with is totally up to you and your creativity! {I bought these white cotton balls from hobby lobby.. they have lots of other things you could use too like feathers, glitter balls, etc.}

Step 1: Unfasten the cardboard hat that you bought and trace the shape on to the back side of the scrapbook paper

Step 2: Cut out the pattern **NOTE: leave about a quarter of an inch border around the border that you traced from the hat. It will allow you to glue the paper over the side of the cardboard to give you nice smooth and clean edges** {Scroll down to the bottom pictures and it will make more sense}

Step 3: Begin gluing the bottom edge of the hat onto the paper. Make sure the edges of your tracing on the paper fit nicely with the hat edges

Step 4: After gluing the bottom edge of the hat onto the paper, cut trianges every half inch to an inch to allow the paper to be folded over and glued to the hat

Step 5: Fold over the paper and hot glue it to the hat


Step 6: Next, glue down the left side and top hole of the hat. **It is important to not glue down the right side because you will have to fasten the two sides together and it is much easier to connect them before the right side flap is glued down. {you may have to play around with this step, I found the most difficult part of this project was figuring out how to get the two sides fastened back together}

Step 7: Once the two sides are fastened together and it looks like a hat again, you can fold over the right side paper flap {for neatness} and then glue the two sides together to make it more secure.


They really dont take long once you figure out how to make them! Here are the supplies you will need:
- cardboard party hats {I bought mine from Hobby Lobby for a few dollars}
- cute scrapbook paper
- hot glue gun & hot glue sticks {plus or minus some aloe vera for all of those burns I give myself!}
- pen
- scissors
- the decor that you use to finish the hat with is totally up to you and your creativity! {I bought these white cotton balls from hobby lobby.. they have lots of other things you could use too like feathers, glitter balls, etc.}

Step 1: Unfasten the cardboard hat that you bought and trace the shape on to the back side of the scrapbook paper

Step 2: Cut out the pattern **NOTE: leave about a quarter of an inch border around the border that you traced from the hat. It will allow you to glue the paper over the side of the cardboard to give you nice smooth and clean edges** {Scroll down to the bottom pictures and it will make more sense}

Step 3: Begin gluing the bottom edge of the hat onto the paper. Make sure the edges of your tracing on the paper fit nicely with the hat edges

Step 4: After gluing the bottom edge of the hat onto the paper, cut trianges every half inch to an inch to allow the paper to be folded over and glued to the hat
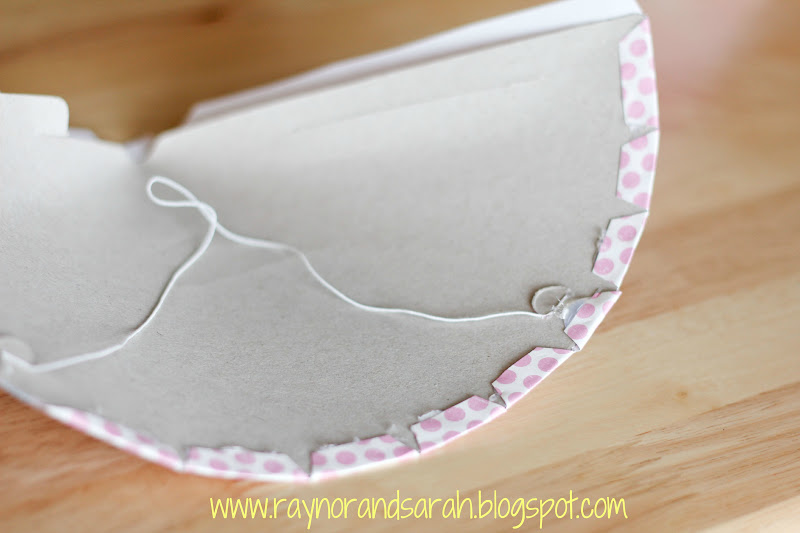
Step 5: Fold over the paper and hot glue it to the hat


Step 6: Next, glue down the left side and top hole of the hat. **It is important to not glue down the right side because you will have to fasten the two sides together and it is much easier to connect them before the right side flap is glued down. {you may have to play around with this step, I found the most difficult part of this project was figuring out how to get the two sides fastened back together}

Step 7: Once the two sides are fastened together and it looks like a hat again, you can fold over the right side paper flap {for neatness} and then glue the two sides together to make it more secure.

Step 8: Decorate! Add whatever embelleshments you like: pearls, rhinestones, burlap, feathers, paper doilles, etc!
Subscribe to:
Posts (Atom)