![]() |
| For this sign, I hot glued the letters onto paper doilies and fed yellow yarn through the holes of the doilies.
Check out Printable Candee Designs here on Etsy for the Pink Lemonade Party Pack that includes all of the designs I used for her decorations! It was so easy! She designed all of the water bottle labels, cupcake tags, food labels and more for only $30! Definitely worth it!
|
Showing posts with label Party Ideas. Show all posts
Sunday, September 23, 2012
Kylar's Pink Lemonade Themed First Birthday Party!
Kylar had such a wonderful first birthday party and we are so thankful for all of our friends and family who came to celebrate it with us! She had so much fun playing with her friends, opening her presents and eating her birthday cake! I still can't believe my sweet baby girl is one but I am loving watching her learn and grow. She never ceases to amaze me with all of the new things she learns! After much planning and preparation, here are some of the highlights of her birthday party!
Thursday, August 9, 2012
DIY: Vintage Paper Birthday Party Hat
For my daughter's first birthday party, I wanted to have cute little party hats for the little ones to wear. Except I was sad to find that there were no cute party hats that were similar to her party theme. So, I decided I would figure out a way to make my own! Here is what I came up with.
They really dont take long once you figure out how to make them! Here are the supplies you will need:
- cardboard party hats {I bought mine from Hobby Lobby for a few dollars}
- cute scrapbook paper
- hot glue gun & hot glue sticks {plus or minus some aloe vera for all of those burns I give myself!}
- pen
- scissors
- the decor that you use to finish the hat with is totally up to you and your creativity! {I bought these white cotton balls from hobby lobby.. they have lots of other things you could use too like feathers, glitter balls, etc.}
Step 1: Unfasten the cardboard hat that you bought and trace the shape on to the back side of the scrapbook paper
Step 2: Cut out the pattern **NOTE: leave about a quarter of an inch border around the border that you traced from the hat. It will allow you to glue the paper over the side of the cardboard to give you nice smooth and clean edges** {Scroll down to the bottom pictures and it will make more sense}
Step 3: Begin gluing the bottom edge of the hat onto the paper. Make sure the edges of your tracing on the paper fit nicely with the hat edges
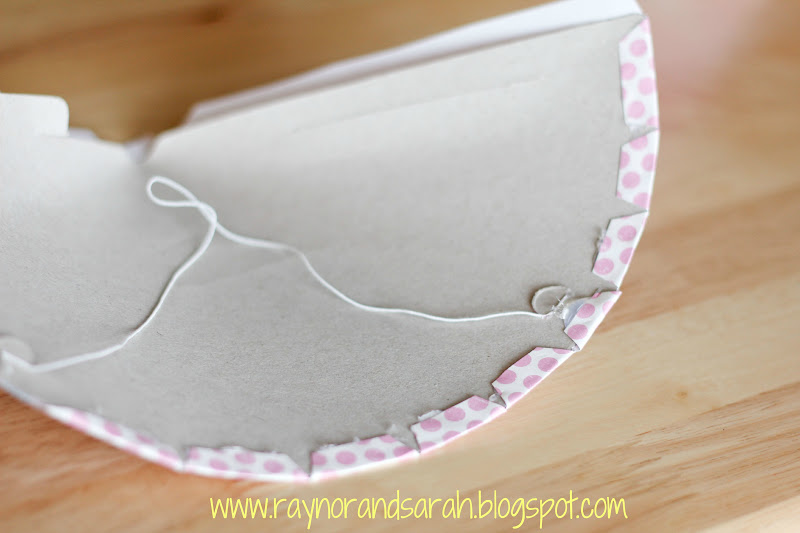
Step 4: After gluing the bottom edge of the hat onto the paper, cut trianges every half inch to an inch to allow the paper to be folded over and glued to the hat
Step 5: Fold over the paper and hot glue it to the hat

Step 6: Next, glue down the left side and top hole of the hat. **It is important to not glue down the right side because you will have to fasten the two sides together and it is much easier to connect them before the right side flap is glued down. {you may have to play around with this step, I found the most difficult part of this project was figuring out how to get the two sides fastened back together}
Step 7: Once the two sides are fastened together and it looks like a hat again, you can fold over the right side paper flap {for neatness} and then glue the two sides together to make it more secure.
They really dont take long once you figure out how to make them! Here are the supplies you will need:
- cardboard party hats {I bought mine from Hobby Lobby for a few dollars}
- cute scrapbook paper
- hot glue gun & hot glue sticks {plus or minus some aloe vera for all of those burns I give myself!}
- pen
- scissors
- the decor that you use to finish the hat with is totally up to you and your creativity! {I bought these white cotton balls from hobby lobby.. they have lots of other things you could use too like feathers, glitter balls, etc.}
Step 1: Unfasten the cardboard hat that you bought and trace the shape on to the back side of the scrapbook paper
Step 2: Cut out the pattern **NOTE: leave about a quarter of an inch border around the border that you traced from the hat. It will allow you to glue the paper over the side of the cardboard to give you nice smooth and clean edges** {Scroll down to the bottom pictures and it will make more sense}
Step 3: Begin gluing the bottom edge of the hat onto the paper. Make sure the edges of your tracing on the paper fit nicely with the hat edges
Step 4: After gluing the bottom edge of the hat onto the paper, cut trianges every half inch to an inch to allow the paper to be folded over and glued to the hat
Step 5: Fold over the paper and hot glue it to the hat

Step 6: Next, glue down the left side and top hole of the hat. **It is important to not glue down the right side because you will have to fasten the two sides together and it is much easier to connect them before the right side flap is glued down. {you may have to play around with this step, I found the most difficult part of this project was figuring out how to get the two sides fastened back together}
Step 7: Once the two sides are fastened together and it looks like a hat again, you can fold over the right side paper flap {for neatness} and then glue the two sides together to make it more secure.
Step 8: Decorate! Add whatever embelleshments you like: pearls, rhinestones, burlap, feathers, paper doilles, etc!
Saturday, May 12, 2012
My Best Friend's Vintage Burlap Inspired Wedding Shower!
My best friend is getting married in a few months and I was so excited to be able to throw her and her fiance, Kevin, a wedding shower! It was a perfect time for celebration because Kevin recently returned from serving in Kuwait. I had so much fun planning this shower and putting together all of the decorations! I wanted this shower to be very special for my best friend to show her how much I appreciate her and her friendship. I will make another post about the games we played but for today I will just share some of the photos of the decor and the links to the "how-to" blog posts I used to create some of these decorations.
I made the burlap frame on the right using cardboard, burlap and wooden letter tiles I found at Hobby Lobby for $2.00! This adorable little frame only cost me about $1.50 + several hot glue gun burns! :) Here is the link for the tutorial to make the burlap frame!
I found the wooden suitcase at Hobby Lobby 50% off for $15!
I made the burlap frame on the right using cardboard, burlap and wooden letter tiles I found at Hobby Lobby for $2.00! This adorable little frame only cost me about $1.50 + several hot glue gun burns! :) Here is the link for the tutorial to make the burlap frame!
I found the wooden suitcase at Hobby Lobby 50% off for $15!
Looking for mason jars or a mason jar look alike?! Look no further! This mason jar look alike is actually a Ragu jar that I saved! {My husband gives me a hard time now because I have gotten into the habit of saving everything! But, I am sure he was very happy that I was able to save some $$ by reusing this jar instead of spending money on a mason jar! :) }. The old books I found at a yard sale for $1 a piece!
Just another little tip: if you are looking for cheap old vintage junk {nice description huh?! :) } try looking at estate sales. I have found several cute items for decorating that has saved me lots of money!
These old bottles I found at a yard sale for $1 each!
For the shower favors, I bought packest of wildflower seed for $1 each.
I had a lot of fun making this Kitchen Towel cake. I think it turned out super cute! I used various kitchen necessities that she will need for cooking. Here is the link to the kitchen towel cake tutorial.
I made this sign by doubling up the burlap and painting on the letters and hearts with brown paint. So easy and so cute!
Now, pictures of the happy couple!!
I love them!
This one is a little blurry but too cute not to share :)
Subscribe to:
Posts (Atom)